|
|
A4LD to T5 Swap in 87-93 2.3L Mustang
(not to be confused
with an AOD-T5 5.0 swap)
|
Performance Parts List |
Price |
|
Clutch (High Performance 6 puck) |
120 |
|
Pressure Plate (Hi-Pressure 88TC) |
40 |
|
Clutch Quadrant (3 hook, Billet Aluminum) |
34 |
|
Clutch Firewall Adjuster (Billet Aluminum)
|
34 |
| UPR
Blu Thunder Shifter
(Short Throw Billet Alum.) |
125 |
This article is specific to the 2.3 Mustang. With minor
changes, it can be used to complete the same swap on a 5.0 Mustang.
I chose to do this swap for three reasons. The first was because I
was sick of the automatic sucking all the power from my car. The
second was because the auto tranny wasn't strong enough to handle the
power my new turbo motor was putting out. Had I not done the turbo
swap, I don't know if I would have ever taken the time to swap trannies.
The third is because I wanted the ladies to ask to drive my stick and to
teach them how to handle the stick. :)
Above is my parts list. This is only the
high-performance pieces I chose to buy. I was fortunate enough to
get the transmission and parts listed below from a Turbo Coupe that my
sister "donated" to my cause. I would highly recommend the
Quadrant and Firewall Adjuster listed above. They are far superior
to the factory plastic, non-adjustable units that are prone to breaking.
Before you ever think of even beginning this swap make sure you
locate all the necessary parts and accessories listed below. If you
can find a complete car then it will simplify the process greatly.
All you need to do is get everything that is manual transmission specific
(different than the auto trans equivalent).
If you want a
printable checklist while you are doing the swap, left-click or
right-click/save-as here:
Tranny Swap How To
If you want a printable list
of parts and tools needed then left-click or right-click/save-as here:
Parts &
Tools
Removal Of
Automatic Transmission: 2 hours
1. Jack up the car as high as your
jackstands will go. If you still can't fit under the car, you either
need to go on a diet or need bigger stands. Put a jack stand near each wheel.
2.
Remove driveshaft. Watch as all the fluid runs onto the floor,
making a big mess. If you have a spare yoke that you can put in the tranny it will prevent the fluid leak.
3.
Disconnect the throttle valve cable and speedometer cable as well as any
plugs that are connected to the trans.
4.
Remove the tranny cooler lines. Don't be afraid to cut them if
necessary.
5.
Remove the inspection plate from the front of the tranny and remove the
torque converter from the flex plate. You will need to rotate the
engine to get to each bolt.
6.
Put a floorjack under the center of the tranny and remove the crossmember.
7.
Use a box end wrench to remove the bellhousing to engine bolts. You
may find it easier to access the top bolts with a long extension. I
found it easier with a wrench.
8.
Remove the transmission. You will have to wiggle and pull back to
get it to pop loose.
9.
Pull the tranny out from under the car. You may have to jack the car
up even higher before it will slide out.
10.
Install inspection plate to keep converter in place.
Shifter Removal:
20 min.
1. Remove the rubber boot that surrounds the automatic shifter.
2. Remove the plastic shifter bezel.
It will look
like it's about to break and then the clips will let go and it will come
loose.
3. Unbolt the shifter base and unhook the cable.
4. Remove the shifter. It will take some force but the base will
finally slide through the console hole.
5.
Now you need to make room for the T5 shifter. You need to
lengthen the front of the hole by 1/2". I have found that cutting a
1.5" by 1" slot in the back of the hole, directly in the center makes
installation of the tranny much easier.
Removal Of Pedal
Assembly: 2 hours
1.
The first step is the remove the driver's side seat and clear out the area
so you can lay on your back for most of this procedure. Once that is
complete you can begin the removal of the pedal assembly.
2.
Remove the plastic cover below the steering column and lower dash.
3.
Remove the hood release cable and bracket.
4.
Remove the 4 bolts that hold the steering column up.
5.
Lower the steering column. Unplug the wires as needed.
6. Remove the steering column. All you need to do is remove the
bolt on the steering shaft under the hood. Once this is removed you can
pull the column out of the car. I did this because it simplifies the
removal of the pedal assembly, if you choose not to do this you will need
to let the column lay beside/on top of you while you lay under the dash
(not a real enjoyable experience).
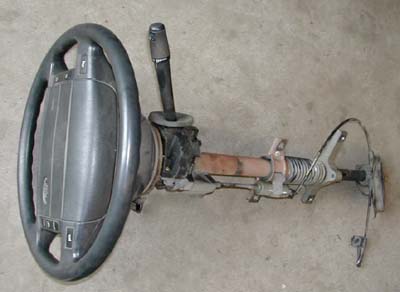
(This is what your
steering column should look like once removed. If it's different
than this, you screwed up)
7. Remove the 4 nuts from the brake booster. You
will need to use a long extension to get to a few of the bolts.
8. Remove the two nuts from the top of the pedal
assembly
9. Remove the brake booster rod from the brake
pedal. Make sure you know how to put it back together.
10. Get out of the car and get under the hood.
Grab the brake booster assembly and pull it forward as far as you can
without crimping anything. You may need to put a screwdriver between the
firewall and booster to hold it forward.
11. Get back under dash and wiggle pedal assembly
loose. There is no easy way to do this. You will just have to
fight it until it comes out. Once you get the assembly loose you may find a few
connectors or wires that you need to unplug to remove the pedal assembly.
At this point your progress should look like this:
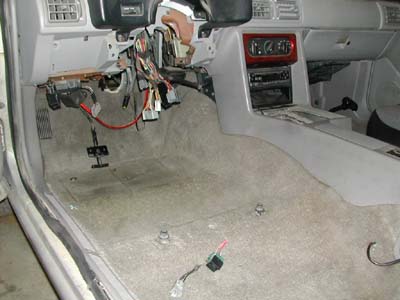
(Notice the big
mess of wires seen here, if you want to impress your friends make sure
they see the car like this...they will think your nuts:)
12.
Try to remove the speedo cable from the back of the speedometer. You will
need to use a pair of long 30 degree needle nose pliers to try to reach it from
under the dash. If you can't get it loose from under the dash you will
need to do the following:
-
Remove the gauge cluster cover.
-
Unplug the
wires.
-
Remove the
gauge cluster. There is one plug on each side and the speedometer cable
holding it back. Don't force the gauge cluster away from the dash too
hard. If everything is removed, you shouldn't need to force it. Once you
complete step 5 you can put the gauge cluster back together.
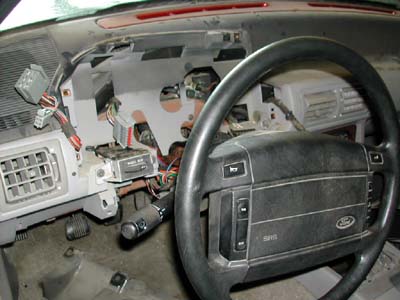
(I took the dash
apart just so you would have an idea of what to expect, I got the speedo
cable hooked back up from below, really I did!)
13.
Pull the speedo cable out from under the hood.
14.
Remove the rubber grommet that is in the hole the speedo cable went
through (see pics below)..
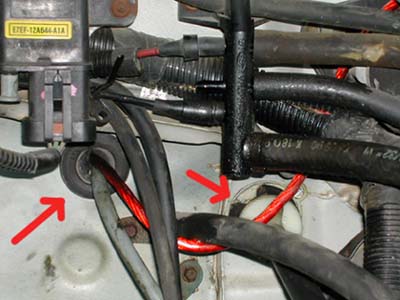
(Note: big red
arrows won't be painted on your firewall:) As you can see, the
speedo is in it's new location and the clutch cable is installed in this
pic.)
15.
Install the grommet in place of the one approximately 2.5" left and 1"
above the old hole. Install the speedo cable through this new hole.
16.
Run the speedo cable back to the speedo and hook it to the back of the
speedometer.
Installation Of Manual
Pedal Assembly: 1 hour
1.
Wiggle the pedal assembly into place. Make sure you slot out the holes in
the brackets that go to the steering column bolts as well as slot the two
middle holes and two of the steering column bolt holes, it will make it
much easier to install the assembly (see pics below). If you don't
slot the holes like shown below, you will have a hell of a time trying to
get the pedals installed.
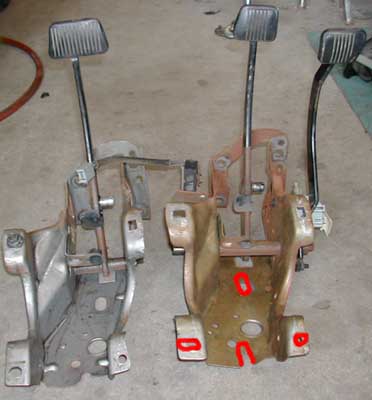
(Here is a comparison
of the pedal assemblies. If your manual one isn't rusty like this it
won't work...J/K:)
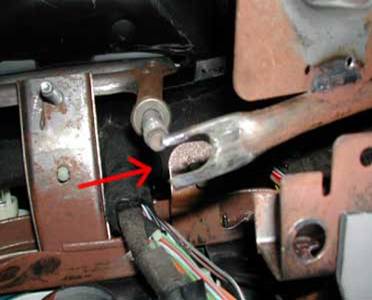
(Make sure you slot
this hole, otherwise you will cry uncontrollably for hours after fighting to install the
manual pedal assembly:)
2. Remove the screwdriver between the firewall and brake booster.
Install the 4 nuts that go on the brake booster bolts.
3. Install the nuts on the top of the pedal assembly.
4. Install the clutch cable in the hole the speedometer cable came out
of. You will need to drill a small hole for the screw to hold the housing
on the cable to the firewall.
5. Locate the clutch neutral safety switch plug under the dash. It is
located above and to the left (towards driver's side fender) of the clutch
pedal. It will be taped up to the main harness. You can look at the plug
on the clutch pedal to see what it is supposed to look like.
6. Install the brake booster rod on the brake pedal.
7.
Install
the clutch cable and hook it to the quadrant.
8. Install the steering column and plug in all the wires. Make sure
everything is plugged in, you don't want to take it back apart later.
9. Install the hood release cable and bracket.
10. Install the plastic cover below the steering column and lower
dash. Now is a great time to vacuum your carpet. You don't have too many
opportunities to get under the seat.
11. Install the driver's seat.
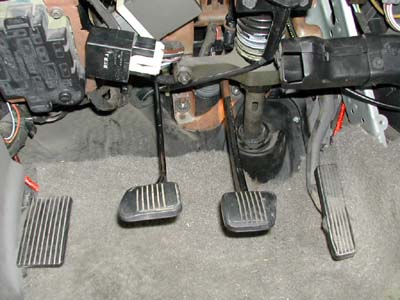
(If yours isn't
this pretty when it's done then too bad, better luck next time:)
Installation
Of Manual Transmission: 2 hours
1. Install the pilot bearing.
2.
Slide the starter index plate into place.
3.
Install the flywheel. Torque the bolts to 85 ft/lbs.
4.
Slide clutch disc into place and center it using a clutch alignment tool.
5.
Bolt the pressure plate to the flywheel. Torque the bolts to 25-30
ft/lbs.
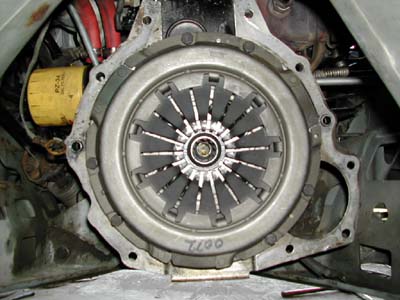
(This is an 87-88
TC pressure plate, the early cars look slightly different. If your
clutch disc and pressure plate isn't centered like this you will be a tired SOB before you get the tranny installed:)
6.
Install the throwout bearing on the tranny.
7.
Install the tranny/bellhousing assembly.
8.
Install the cross member.
9.
Change the
Auto's neutral safety switch to a T5(Z)'s reverse light switch. The Auto's
wiring harness for this consists of 4 wires. In most cases, this section
of wire can be replaced with a simple 2-wire T5 harness. The 2 wires go to
the reverse light switch and the other 2 wires are connected with a jumper
wire already on the harness. The colors are the same so it's easy to see
what colors need to connect to what.
10.
Hook the clutch cable to the tranny.
11.
Install the speedometer gear in the tranny. You will need to grind
down the "nipple" on the end of the gear to make it about 1/4" shorter.
If you are using the 5 speed car's rear end as well then you can just use
the manual trannies speedo gear.
12.
Fill
the tranny with Dexron auto tranny fluid. You will need to use an oil pump
from under the car or try to fill in through the shifter hole.
13.
Install the driveshaft.
14.
Install the shifter boot, handle, knob, and bezel.
If you have any questions contact us
HERE
Stinger Performance Engineering 2016 |